| 일 | 월 | 화 | 수 | 목 | 금 | 토 |
|---|---|---|---|---|---|---|
| 1 | 2 | 3 | 4 | |||
| 5 | 6 | 7 | 8 | 9 | 10 | 11 |
| 12 | 13 | 14 | 15 | 16 | 17 | 18 |
| 19 | 20 | 21 | 22 | 23 | 24 | 25 |
| 26 | 27 | 28 | 29 | 30 | 31 |
- Python
- 속성
- 코딩도장
- 기사
- TensorFlow
- AIFFEL
- 머신러닝
- 파이썬
- 데이터사이언티스트
- 추천시스템
- Set
- 자연어처리
- 데이터사이언스 스쿨
- 카카오
- 사이킷런
- 제어문
- 후기
- numpy
- 데이터분석
- 제로베이스 데이터사이언스
- 함수
- 딕셔너리
- 아이펠
- 파이썬코딩도장
- 클래스
- 재귀함수
- AI
- NLP
- 스크랩
- 딥러닝
- Today
- Total
뮤트 개발일지
AIFFEL 아이펠 11일차 본문
import os
import cv2
import matplotlib.pyplot as plt
import numpy as np
import dlib
opencv: 이미지 처리를 위한 모듈
matplotlib: 이미지를 출력하기 위한 모듈
my_image_path = os.getenv('HOME')+'/aiffel/camera_sticker/images/IU.jpg'
img_bgr = cv2.imread(my_image_path)    # OpenCV로 이미지를 불러옵니다
img_show = img_bgr.copy()      # 출력용 이미지를 따로 보관합니다
plt.imshow(img_bgr)
plt.show()
matplotlib, dlib 등의 이미지 라이브러리는 이미지 채널을 RGB 순으로 사용하지만 opencv는 예외적으로 BGR을 사용한다. 그래서 원본사진에서 붉은색은 푸른색으로, 푸른색은 붉은색으로 바뀌어 출력된 것이다. 그러므로 opencv에서 다룬 이미지를 다른 이미지 라이브러리를 활용하여 출력하려면 색 보정처리를 해줘야 한다.
# plt.imshow 이전에 RGB 이미지로 바꾸는 것을 잊지마세요.
img_rgb = cv2.cvtColor(img_bgr, cv2.COLOR_BGR2RGB)
plt.imshow(img_rgb)
plt.show()
# detector를 선언합니다
detector_hog = dlib.get_frontal_face_detector()
# 얼굴의 bounding box 추출
img_rgb = cv2.cvtColor(img_bgr, cv2.COLOR_BGR2RGB)
dlib_rects = detector_hog(img_rgb, 1) # (image, num of image pyramid)cvtColor(): dlib은 RGB 이미지를 입력으로 받기 때문에 cvtColor()를 이용해서 opencv의 BGR 이미지를 RGB로 변환
detector_hog의 두 번째 파라미터: 이미지 피라미드의 수
* 이미지 피라미드: upsampling 방법을 통해 크기를 키우는 것
https://opencv-python.readthedocs.io/en/latest/doc/14.imagePyramid/imagePyramid.html
Image Pyramids — gramman 0.1 documentation
Theory 일반적으로는 고정된 이미지 사이즈를 작업을 하지만, 때때로 동일한 이미지에 대해서 다양한 사이즈를 가지고 작업을 해야 하는 경우가 있습니다. 만일, 이미지에서 얼굴을 찾을 경우에
opencv-python.readthedocs.io
# 찾은 얼굴 영역 박스 리스트
# 여러 얼굴이 있을 수 있습니다
print(dlib_rects)

for dlib_rect in dlib_rects:
    l = dlib_rect.left()
    t = dlib_rect.top()
    r = dlib_rect.right()
    b = dlib_rect.bottom()

    cv2.rectangle(img_show, (l,t), (r,b), (0,255,0), 2, lineType=cv2.LINE_AA)

img_show_rgb =  cv2.cvtColor(img_show, cv2.COLOR_BGR2RGB)
plt.imshow(img_show_rgb)
plt.show()
dlib.rectangle객체는 left(), top(), right(), bottom(), height(), width() 등의 멤버 함수를 포함한다.
(0, 255, 0)은 초록색, 2는 선 굵기를 의미
model_path = os.getenv('HOME')+'/aiffel/camera_sticker/models/shape_predictor_68_face_landmarks.dat'
landmark_predictor = dlib.shape_predictor(model_path)
list_landmarks = []
# 얼굴 영역 박스 마다 face landmark를 찾아냅니다
for dlib_rect in dlib_rects:
points = landmark_predictor(img_rgb, dlib_rect)
# face landmark 좌표를 저장해둡니다
list_points = list(map(lambda p: (p.x, p.y), points.parts()))
list_landmarks.append(list_points)
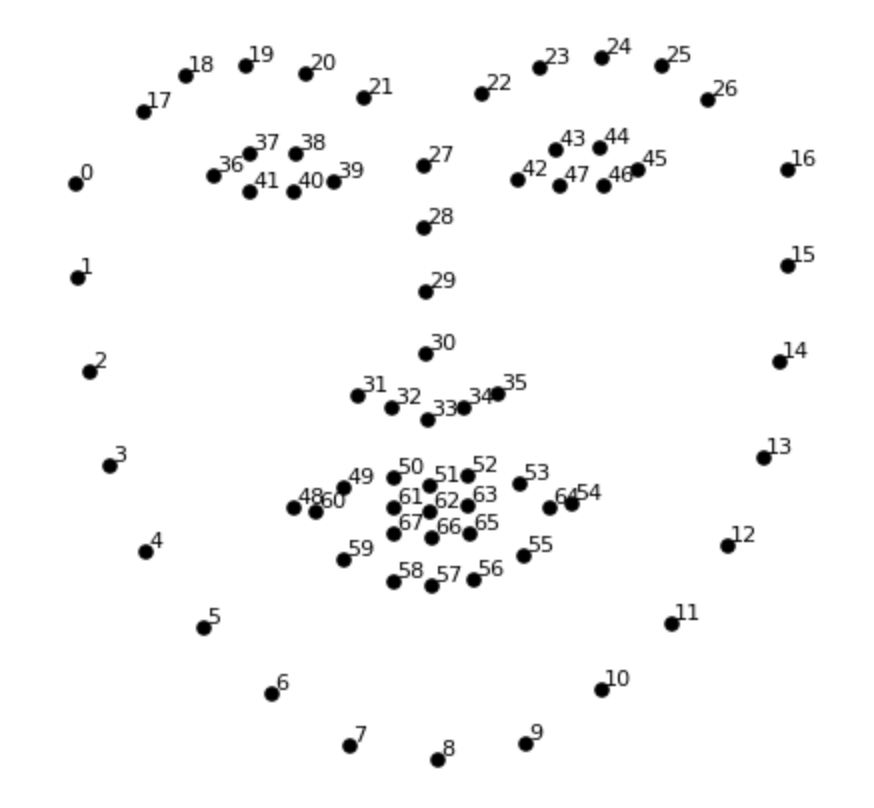
print(len(list_landmarks[0]))>>> 68
list_points는 tuple (x, y) 68개로 이루어진 리스트가 된다.
이미지에서 찾아진 얼굴 개수마다 반복하면 list_landmark에 68개의 랜드마크가 얼굴 개수만큼 저장된다.
for landmark in list_landmarks:
    for point in landmark:
        cv2.circle(img_show, point, 2, (0, 255, 255), -1)

img_show_rgb = cv2.cvtColor(img_show, cv2.COLOR_BGR2RGB)
plt.imshow(img_show_rgb)
plt.show()
for dlib_rect, landmark in zip(dlib_rects, list_landmarks):
    print (landmark[30])
    x = landmark[30][0]
    y = landmark[30][1]
    w = h = dlib_rect.width()
    print ('(x,y) : (%d,%d)'%(x,y))
    print ('(w,h) : (%d,%d)'%(w,h))
스티커의 위치를 지정한다. 콧등 30번을 기준으로 한다.
sticker_path = os.getenv('HOME')+'/aiffel/camera_sticker/images/cat-whiskers.png'
img_sticker = cv2.imread(sticker_path) # 스티커 이미지를 불러옵니다
img_sticker = cv2.resize(img_sticker, (w,h))
print (img_sticker.shape)
>>>(322, 322, 3)
refined_x = x - w // 2
refined_y = y - h // 2
print ('(x,y) : (%d,%d)'%(refined_x, refined_y))
>>> (x, y) : (190, 215)
이미지 시작점은 top-left 좌표이기 때문에 x, y좌표를 조정한다.
if refined_x < 0:
    img_sticker = img_sticker[:, -refined_x:]
    refined_x = 0
if refined_y < 0:
    img_sticker = img_sticker[-refined_y:, :]
    refined_y = 0

print ('(x,y) : (%d,%d)'%(refined_x, refined_y))
>>> (x, y) : (190, 215)
이 때, 스티커가 이미지 범위에서 벗어나 음수 값을 가진 부분이 생길 수 있기 때문에 조건식으로 잘리도록 만들어준다.
# 길어서 복잡해 보이지만 img_show[from:to] 형식입니다
sticker_area = img_show[refined_y:refined_y+img_sticker.shape[0], refined_x:refined_x+img_sticker.shape[1]]
img_show[refined_y:refined_y+img_sticker.shape[0], refined_x:refined_x+img_sticker.shape[1]] = \
    np.where(img_sticker==0,img_sticker,sticker_area).astype(np.uint8)
sticker_area: 원본이미지에서 스티커를 적용할 위치를 crop한 이미지
스티커 이미지에서 사용할 부분은 검정 부분이다. 따라서 np.where을 통해 img_sticker가 0인 부분은 img_sticker를 사용하고, 아닌 부분은 sticker_area를 사용하도록 한다.
plt.imshow(cv2.cvtColor(img_show, cv2.COLOR_BGR2RGB))
plt.show()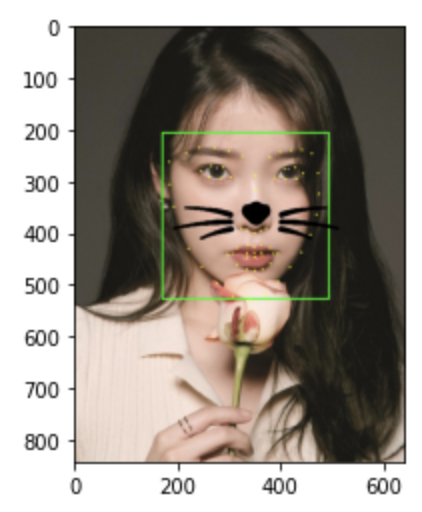
sticker_area = img_bgr[refined_y:refined_y +img_sticker.shape[0], refined_x:refined_x+img_sticker.shape[1]]
img_bgr[refined_y:refined_y +img_sticker.shape[0], refined_x:refined_x+img_sticker.shape[1]] = \
    np.where(img_sticker==0,img_sticker,sticker_area).astype(np.uint8)
plt.imshow(cv2.cvtColor(img_bgr, cv2.COLOR_BGR2RGB))
plt.show()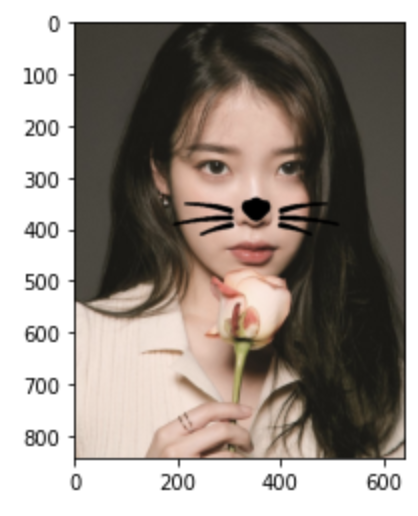
랜드마크와 테두리를 지워주면 끝!
'AIFFEL' 카테고리의 다른 글
| AIFFEL 아이펠 13일차 (0) | 2022.01.13 |
|---|---|
| AIFFEL 아이펠 12일차 (0) | 2022.01.12 |
| AIFFEL 아이펠 10일차 (0) | 2022.01.11 |
| AIFFEL 아이펠 사이킷런으로 구현해보는 머신러닝 (0) | 2022.01.10 |
| AIFFEL 아이펠 9일차 (0) | 2022.01.06 |

